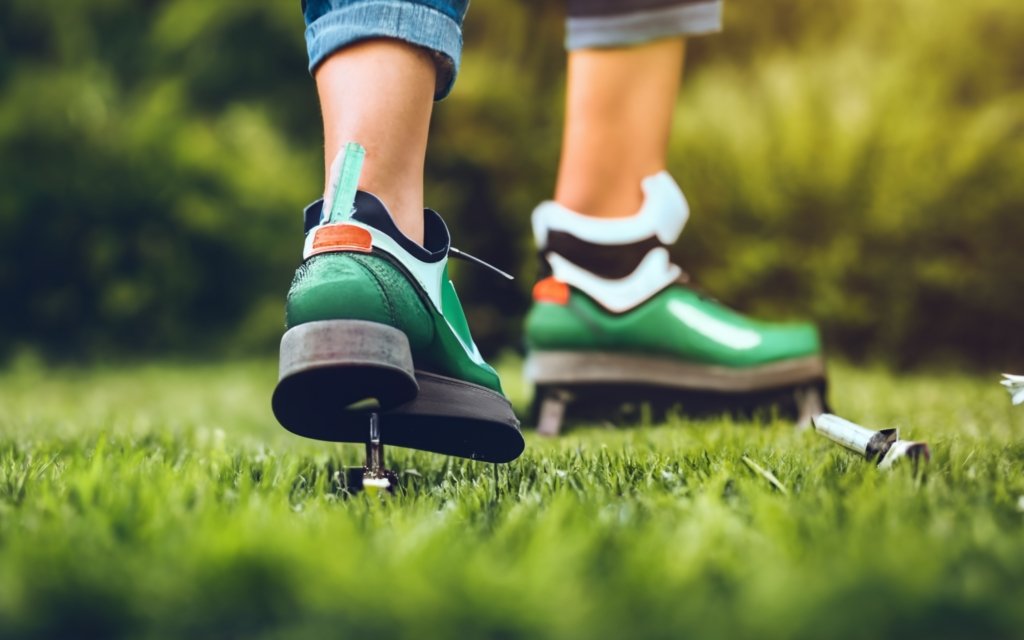
Lawn aerator shoes shuffling, sliding, and flopping off feet mid-project can really shred your landscaping plans. Don’t let ill-fitting equipment trip up your DIY aerating goals. With the right gear tricks and informed lawn care, you can puncture that turf without eating mud. From supportive shoe types to proper spike lengths and debris removal, we’ve got you covered for non-slip aerator success. Forget irritating slippage – it’s time to pierce that grass like a pro!
Why Lawn Aerator Shoes Slip Off
Lawn aerator shoes are a great way to punch holes in your lawn to improve aeration. But nothing is more frustrating than when those shoes start sliding and slipping all over the place! A sloppy, loose fit can really ruin your DIY lawn care plans.
So why do aerator shoes lose their grip and shuffle off your feet? There are a few common culprits to blame.
Shoes Too Big
This is probably the most obvious reason aerator shoes slip off. If the shoes are too big for your feet, there will be extra room inside for your foot to slide forward and back while walking.
You stomp down, your foot slides up, and the whole contraption slips right off. No bueno.
Getting properly fitted aerator shoes is key. When trying on shoes, make sure to wear the same type of socks you’ll use when aerating. The thickness of socks can impact the fit.
Ideally, there should be about a half inch of space between your toes and the tip of the aerator shoe. Your heel should not be lifting in and out of the back of the shoe when you walk.
If the shoes are still loose after tightening the straps, you may need a smaller size. Don’t suffer with oversized shoes in the name of wishful thinking!
Straps Not Tight Enough
Straps are the key to securing aerator shoes to your feet. But if they aren’t tightened properly, the shoes will be dancing all over the place.
Really crank down on those straps to keep the shoes snug in place. The straps should feel very tight, almost uncomfortably so. Don’t worry about cutting off circulation – a little light foot pain is worth not face-planting into your lawn!
Ideally the straps will use strong Velcro or buckles. But even with standard shoe string style straps, just be sure to double-knot them to maximize tightness. Check the fit after a few steps and re-tighten as needed.

Wrong Type of Shoe
Not all shoes are created equal when it comes to aerating. The shape and support offered by different shoe styles varies quite a bit.
Full coverage shoes like sneakers or boots tend to grip best. The ankle support helps stabilize the aerator and reduce sliding.
Sandals, flats, and low-cut shoes are risky choices. Without the ankle support, the aerator is more prone to tilting and slipping off.
If possible, choose high-top athletic shoes or boots to attach your aerating spikes to. The extra coverage really improves stability and allows you to walk naturally without your shoes escaping.
Spikes Too Short
Here’s a fact: short spikes don’t grip as well as long spikes. That’s just science.
Most aerator shoes come equipped with 1-2 inch spikes, which is generally long enough for solid traction. However, if you purchased a budget pair with spikes less than an inch long, that could be the source of your sliding woes.
Shorter spikes don’t penetrate the soil as deeply, so there’s less resistance as you walk. It’s the same principle as running shoes vs. soccer cleats – deeper traction lugs grip better.
Consider upgrading to an aerator shoe set with longer, more aggressive spikes around 1.5-2 inches in length. The extra spike depth will help grab the soil better and eliminate sliding.
Uneven Lawn Surface
An uneven lawn is a slippery slope…quite literally when it comes to aerator shoes.
Bumpy soil, holes, rocks, and debris scattered across your lawn can all contribute to unsteady walking conditions. It’s like trying to cross a rocky stream in flip flops – uncertain footing ahead!
Before strapping on your aerator shoes, inspect the area and fill any holes or large dips in the terrain. Remove sticks, acorns, pine cones and other tripping hazards. Mow if needed to even out the turf height.
If there are patches that can’t be leveled out, try to avoid them or use extra care when walking over them. Take slow, short, flat-footed steps rather than long strides. Keeping your weight centered will improve traction on uneven ground.
With the right fit, tight straps, supportive shoe type, adequate spike length, and level walking surface, your aerator shoes will stay locked on your feet during lawn care. Don’t let slippage trip you up – address any issues and you’ll be aerating like a pro. Happy poking holes!
Tips To Prevent Slipping
Lawn aerator shoes shuffling around can really shred your landscaping plans. But don’t let annoying slippage ruin your DIY aerating experience! With the right preparation and equipment, you can keep those shoes secured and get to puncturing.
Here are some handy tips to avoid slip and slide and keep your aerator shoes on track:
Get Properly Fitted Shoes
An ounce of prevention is worth a pound of faceplants. Start with aerator shoes that actually fit your feet properly!
A loose sliding fit is no good. You want your shoes to hug your feet like an obsessive ex.
Measure Feet
First, measure the length and width of your feet. Tracing your feet on a piece of paper is an easy way to get their dimensions. Measure from the very back of your heel to the tip of your longest toe.
Make sure to measure both feet – they may not be exactly the same size. And measure them at the end of the day when your feet are at their largest after being on them all day.
Buy According to Size Chart
Use your foot measurements to pick the right aerator shoe size based on the manufacturer’s sizing chart.
Don’t just assume you are a certain size. Feet change over time, so even if you’ve been a 10 forever, your current foot length is what matters.
Size up if you’re between sizes to allow some extra room for thick socks. But don’t go more than a half size up from your measured length.
Tighten Straps
Cinch those straps down nice and tight for a locked-in fit.
Pull Hard on Straps
Really crank on the straps as hard as your grip strength will allow. The shoes should feel very snug and secure when properly tightened.
Use Buckles or Velcro
Aerator shoes with buckles or heavy-duty Velcro allow you to customize the fit and get the straps tighter than basic shoe strings.
Check Fit Often
Re-tighten straps after a few steps, and periodically as needed while working. As you walk, the shoes and straps shift and can loosen. A quick re-tightening takes just seconds but saves you from yards of yanking and slipping.

Choose Shoes With Ankle Support
Pick shoes that wrap securely around your ankles to improve stability.
High Tops
High top athletic shoes provide extra ankle coverage and support. The extra material grips legs better and reduces wobbling.
Boots
For maximum ankle stability, boots are ideal. The high tops cover and grip nearly the entire ankle and lower calf area for great security.
Use Longer Spikes
Longer spikes sink deeper into soil for enhanced traction and less sliding.
1-2 Inches Best
Most standard aerator spikes are 1-2 inches, which works well in typical lawn soil. This length prevents excessive slippage while still being easy to pull back out.
Longer for Softer Ground
In sandy or muddy areas, use spikes around 2-3 inches for better penetration and grip. Just take care not to poke all the way through root zones and puncture irrigation lines!
Level Lawn First
Fix dips, bumps, holes and debris that can trip you up and cause sliding.
Fill Holes
Use leftover soil and grass seeds to fill divots and dips, especially along walking paths.
Remove Obstacles
Clear away sticks, rocks, pine cones and other loose objects that are tripping hazards.
Use Grip Tape
For extra traction, stick grip tape or anti-slip pads onto the bottoms of aerator shoes. The added texture helps grip grass better. Replace as the tape wears down.
With a bit of prep work and the right gear, you can tackle any lawn terrain free of frustrating footwear slippage. Focus on your footing and the aerating results will follow!
What To Do If Shoes Keep Slipping
Even with proper fit and preparation, aerator shoes can still occasionally slip and slide around.
If you’re finding your shoes just won’t stay put no matter what, try these troubleshooting tips to finally achieve traction traction paradise:
Add More Straps
The key to secure shoes is straps, straps, and more straps! Adding extra straps amps up the holding power.
Purchase an accessory strap set to supplement the straps your shoes came with. Focus on strapping the heel and midfoot areas for maximum security. The more contact points holding your foot in place, the better!
Use Athletic Tape
Wrap athletic tape or kinesiology tape across the top of your foot and around the back of your ankle. This helps lock the heel in place so your foot stops sliding forward.
You can also tape the straps themselves flat against the shoes. This prevents them from loosening and slipping during use.
Switch to Different Shoe Type
If your current shoes just aren’t cutting it traction-wise, ditch ’em!
Swap your low-top, minimal sneakers for a more supportive shoe style like boots or high-top sneakers. The increased ankle coverage improves stability and reduces sliding.
Hiking shoes or work boots with aggressive tread also resist slipping well thanks to grippy rubber soles.
Go for footwear with foothold-focused features like D-ring lacing, padding, and flexible non-slip materials.
Apply Grip Spray
Specialty sprays exist to help shoes cling to slippery surfaces. Spray a product like this onto the bottoms of your aerator shoes to make the spikes “stickier.”
A homemade DIY option is spraying a 50/50 vinegar and water solution onto shoes. The mild acid in vinegar removes slick residue and improves traction.
Reapply grip spray as needed, especially if walking in damp soil. As soil sticks to shoes, renewed grip help keeps your footing steady.
Walk Heel-To-Toe
Adjusting your walking motion can also help when dealing with slider shoes.
Concentrate on planting each step flat-footed and rolling fully from heel to toe. Take shorter strides instead of long lunges.
This controlled, stable motion keeps your weight centered over each foot, reducing sliding forces. It may feel silly, but can really improve slippery shoe traction!
With a combo of equipment aids and careful walking, you can aerify even with stubborn slippery shoes. Don’t let annoying footwear ruin your lawn perfection vision – outsmart slippery shoes instead!
Proper Usage Tips
Mastering your walking form while aerating is crucial for maximum lawn penetration and minimum footwear slippage.
Follow these pro tips to stomp through your turf like a pro:
Take Normal Steps
Walk naturally with a typical stride length. Dramatically altering your gait can make the shoes more prone to wobbling.
Land flat-footed and roll smoothly heel-to-toe. Avoid bouncing or stomping, which can dislodge spikes. Let those spikes naturally pierce the ground as you walk normally.
Maintaining a natural walking motion also prevents back, hip, and leg strain from funny footing.
Adjust Pressure As Needed
Gauge the type of soil and use appropriate pressure with each step.
In soft, muddy ground, your full body weight may easily penetrate the earth. In super hard, compacted soil, intentionally leaning into steps more can help drive the spikes in.
Find the Goldilocks middle ground of not too much, not too little pressure for optimal soil piercing. Don’t force the spikes through overly hard – let the spike length do the work.
Work in Different Directions
Don’t just walk back and forth in straight lines. Zig-zag across your lawn, working top to bottom then side to side.
Varying direction ensures even aeration coverage. Straight lines can create compacted “tracks” where spikes continuously compress the same areas.
Cross-hatching at angles ensures you hit the whole yard evenly for consistent health benefits.
Remove Debris Buildup
As you walk, clear off debris that sticks to spikes frequently. Soil, grass clumps, and other gunk left on the spikes prevents full penetration when stepping.
Carry a small brush, stick, or gardening trowel to periodically wipe spikes clean mid-project. Quick wipedowns restore piercing performance.
Pro Tip: Spray shoes with non-stick cooking spray before use to reduce sticky buildup. Reapply as needed.
With mindful, strategic walking habits, you’ll get the most out of your aerator shoes. Consistent coverage and debris-free spikes are key for soil and grass health. Stroll with purpose!
And most importantly, be sure to re-tighten those straps regularly. Even flawless walking form loses its traction if shoes start slipping!
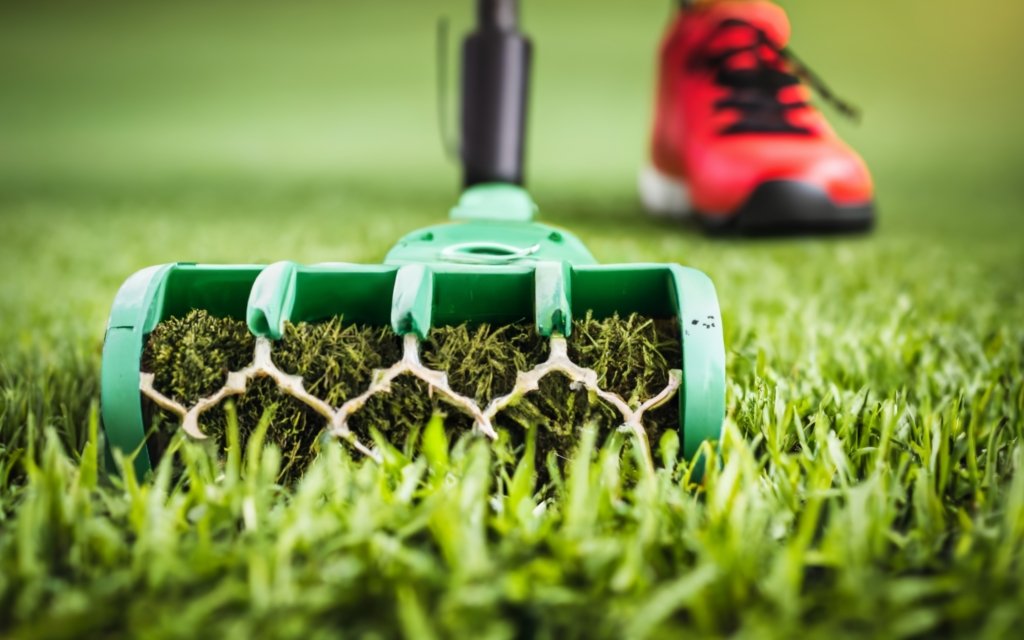
Benefits of Lawn Aeration
Punching holes across your yard with aerator shoes has some major perks! Aerating improves soil health and grass growth in a variety of helpful ways.
Improves Drainage
Those holes create new pathways for rainwater to drain down through the soil rather than pooling on the surface or running off.
Better drainage prevents muddy puddles, erosion, and flooded grass. Excess moisture can suffocate roots and breed fungal diseases. Proper drainage eliminates excess wetness issues.
The improved infiltration also helps flush salts from the root zone. Salt buildup harms soil structure over time. Drainage holes flush out the bad salts so good salts remain.
Allows Oxygen to Roots
In addition to drainage, aeration holes enable vital air circulation to roots.
Dense, compacted soil prevents air pockets from forming. Choking off oxygen supply damages plant root health and function.
Aerating combats compaction, opening air channels down into the soil. Roots can finally “breathe” with access to the oxygen they need.
Reduces Soil Compaction
That hard, packed-down soil in high traffic areas is called compaction. It’s terrible for root development and nutrient absorption.
Regular aeration physically busts up those concrete-like soil conditions. Spiking creates more loose, crumbly soil texture for roots to spread into.
Reduced compaction also makes it easier for new grass seeds to take hold and sprout. The tender baby roots can penetrate looser ground as they establish.
Enhances Nutrient Absorption
Loose, aerated soil not only accepts nutrients better but also retains them in plant-available form longer.
Dense soil lacks the pore spaces for fertilizers to occupy. Fertilizer molecules get washed away before plants can absorb them.
With aeration, fertilizer salts have open crevices to dissolve into. The improved cation exchange capacity helps trap positively charged nutrients. Plants get more “bang for your buck” from fertilizers applied to aerated ground.
Encourages Grass Growth
Fixing drainage, improving oxygen, easing compaction, and enhancing nutrition all equate to healthier, thicker turfgrass.
Aerating stresses the existing lawn slightly which triggers growth and self-repair mechanisms. So the grass literally grows better after being tromped on a bit!
Your lawn will look fuller, greener, and lush if proper aeration practices are followed 1-2 times per year. Aeration boot camp = a championship lawn!
The spike-riddled post-apocalyptic look of an aerated lawn belies big benefits going on underneath. Don’t be fooled – that spongy, hole-filled surface means your soil is on its way to prime growing conditions.
When to Aerate Lawn
Timing is everything when it comes to lawn care tasks like aerating. Targeting specific seasons and situations will maximize the benefits for your turfgrass.
Here’s when you should break out the aerator shoes for optimal results:
Spring
Early in the growing season as temperatures warm up is an ideal time to aerate. April-May for cool season northern grasses, March-April for southern warm season varieties.
Spring aerating helps remove compaction built up over winter dormancy. It also allows fertilizers applied later in spring to penetrate better when grass begins rapid growth.
The root zones are already moist from spring rains, so aerating holes remain open without closing up immediately.
As an added bonus, spring soil is soft enough to easily penetrate but firm enough that spikes don’t sink in too deep.
Fall
September-October is another prime aerating window, especially for cool season grasses before winter dormancy.
Growth rates slow down but root activity is still robust in fall. Aerating at this time lets new oxygen reach deep roots before the ground freezes over winter.
The grass has time to recover before going dormant without risking water stress in summer heat. Cooler fall temperatures are easier on actively growing turf.
September seeding is common, so aerating just prior opens the soil for solid seed-to-soil contact.
During Dry Spells
If weather has been hot, dry, and drought-like for multiple weeks, an extra mid-summer aeration session can perk things up.
Opening drainage channels helps dry soil retain any rain that does fall. Hard, cracked ground also benefits from getting pierced.
Try to aerate in the morning while soil is still somewhat cool. Avoid midday heat to reduce grass stress.
Be sure to water deeply the day before for easier spike penetration. And water again after to prevent too much moisture loss through new holes.
Before Overseeding
If you’ll be seeding new grass into existing turf, first poke those seed bed holes!
Aerating 4-7 days prior to spreading seed allows time for soil to settle back around the holes after being disturbed.
The holes give seeds direct contact with soil for good germination rates rather than sitting on top of thatch.
After overseeded areas fill in, aerate again to reduce matting as the new grass establishes. Two-stage aerating prevents baby grass from getting crowded out.
Targeting the right timing for your lawn’s needs results in the biggest aerating benefits. Mark the ideal seasons on your calendar and stomp away!
Key Takeaways
Getting the most out of your DIY lawn aeration requires forethought and finesse. Here are the key tips to remember:
- Properly fitted shoes with tight straps are critical to prevent slipping off feet. High-top athletic shoes or boots work best.
- Longer 1-2 inch spikes provide good traction and soil penetration.
- Walk naturally heel-to-toe; adjust pressure based on soil type. Vary route to cover the lawn evenly.
- Clear debris buildup on spikes periodically to maintain penetration ability.
- Address slipping issues with more straps, grip tape/spray, or different shoes.
- Aerate in early spring, fall, during dry spells, and before overseeding for ideal timing.
- Aeration improves drainage, oxygen, compaction, nutrition, and growth for healthier grass.
With properly equipped shoes and informed care, aeration boot camp transforms lackluster lawns into championship turf. Aerate like a pro and watch your grass thrive!
Frequently Asked Questions
Q: How often should I aerate my lawn?
A: Most lawns benefit from aeration 1-2 times per year – once in spring and once in fall. High traffic areas may need extra summer aeration.
Q: How long should aerator spikes be?
A: 1-2 inch spike length is best for typical soil types. Go 2-3 inches in sandy or muddy ground for better grip.
Q: Do aerator shoes work well on slopes?
A: Steep hills can be challenging. Take slow short steps and work side-to-side rather than up-down slopes.
Q: Should I water my lawn before aerating?
A: Watering lightly before helps spikes penetrate soil. Don’t soak ground to the point of being muddy.
Q: What pace should I walk while aerating?
A: Normal walking speed, heel-to-toe motion works well. Don’t stomp or shuffle feet excessively.
Q: How can I avoid excess soil compaction when aerating?
A: Walk across turf in different directions rather than along straight lines over and over.
Q: How soon can I mow after aerating?
A: Wait at least 2-3 days for soil to settle back into holes before mowing. Adjust mower height to avoid hitting spikes.
Q: How do I clean soil off my aerator shoes?
A: Use a stick, brush, or water hose to quickly scrape debris off spikes between passes.
Q: What areas of my yard should I focus on aerating?
A: Prioritize high traffic zones, shady sections, and areas with poor drainage or runoff issues.